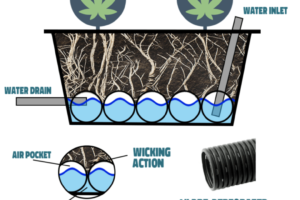
The sub irrigated planter (SIP) is a DWC-soil hybrid. It is perfect for high temp or outdoor applications. It is essentially a mini aquifer that allows plants to wick water up as they need it. The main advantage of a sub irrigated planter is that the bottom of the planter holds a large reservoir of nutrient-rich water, decreasing the amount of times you need to water the planter. The 16″ x 16″ x 8′ planter I built below holds 20 gallons of water in the bottom 3.75″ of the reservoir! A regular planter that size would be saturated after 5 gallons of water. That’s an extra 5-10 days of being able to leave the plants without worrying about watering them (depending on VPD or transpiration).

Unlike in DWC the roots are not submerged 24/7, so you don’t need to aerate the water with a pump and airstones. The roots ‘SIP’ water from the submerged bed (excuse the pun). When using perforated pipe that is closely spaced together there is no need to use a fabric wicking material as some guides ill advise. As long as the gap between the perforated pipe does not exceed 0.5″ the soil that gets in there will only act as a wick and will not get root rot.
There are a few underlying principles all SIP’s require
- The reservoir must but water tight with no leaks. Use either a tote or 45mm pond liner if building a wooden bed
- The drain port must drain the tank when the pipes are 75% submerged
- Buy pre-perforated pipe (not solid pipe)
- Use high porosity soil with good drainage
- No animal manure, organic nutrients are ok
- Pipes should be close together (almost touching) and fill the entire bottom
- Beds should be 16″ – 18″ deep total
- 8′ wide beds are the most cost effective as pond liner usually comes in 10′ rolls and 1x6x8 is a common size of pressure treated wood used for fence board
Materials Needed:
- 4″ Perforated Pipe (my bed used 24′)
- 45mm Pond Liner (avoid the 14mm that home depot sells, it’s too thin)
- 50x 2″ wood screw
- 20x 3 1/2″ wood screws
- 1/4″ staples
- 5′ 3/4″ PVC Pipe
- Oil Funnel (or cut up water bottle)
- Duct Tape
- ProMix HP Soil (my bed took 2x 3.8 cu ft bundles to fill)
Wood List:
- 10 pcs 1x6x8 PT Wood
- 2 pcs 2x4x8 PT Wood
Cut List:
- 9x 8′ 1×6 (stock length)
- 6x 15.9″ 1×6
- 4x 15.5″ 2×4
- 4x 11.75″ 2×4
- 4x 15.5″ 2×4 cut at 45 degrees (optional)
Tools Needed:
Start by laying out the wood you bought.


Relax, and inspect the wood you purchased. Put any warped or defective pieces on the bottom of the planter, using the nicer pieces to make the outside of the side walls.


Use the 15.5″ 2×4’s to secure 3 pieces of stock length 1×6 boards together. The floor piece should be secured together using the two shorter 11.75″ pieces of 2×4.


Drill a 1″ hole for the 3/4″drainage pipe. The drainage pipe needs to be drilled to allow the water level to reach 70-80% of the perforated pipe. Cut a small cross section of pipe and use it to verify the height before you drill.


Cap the end of the pipes to prevent soil from coming in. You can use leftover pond liner or any thick plastic and duct tape to seal off the ends.


Insert the 3/4″ drain pipe through the 1″ drainage hole you made earlier. Make a very small incision into the pond liner and pull the drain pipe through. If you make a very small hole the pond liner will stay tight and keep a relatively water tight seal. Drill a 1″ hole into the perforated pipe closest to the drainage hole. This pipe should go into the side of one of the perforated pipes. It does not need to go into more than one perforated pipe.


Fill the planter with water at this point to test if your drain pipe is at a good level. The perforated pipes should be 70-80% submerged.


Install the remaining pipe and funnel/water bottle on the opposite end of the drain. This will allow you to fill the SIP with nutrients without having to go through the soil.


Add General Hydroponics nutrients to the SIP. I use the GH nutrient calculator to calculate that my 20 gallon SIP required 280 mL FloraGro, 200 mL FloraMicro & 100mL FloraBloom. I pH’d my water down to 6.5. A bit higher than the 5.5 used for DWC.


After the soil is added you can transplant your plants in. I happen to have very mature clones from my aeroponics cloner that are ready to hit the garden.


Transplant the clones in by making a hole that goes down to the drain pipes. You want to let the plants tap in as early as possible if going from an aeroponics cloner.


The plants will likely wilt at first as transplanting from DWC to soil is always stressful.


I mix highly concentrated solutions to get ppm of rainwater that had collected up. This SIP holds 20 gallons in the water reservoir. I use the nutrient calculator to figure out how much nutrients 20 gallons would need. I then mix that into 1-2 gallons, add it to the SIP and then add straight tap water until outflow started out of the drain pipe.


You can test the ppm and pH of the outflow to diagnose issues. My plants were healthy throughout the entire grow so I did not stress about this. Soil also helps buffer pH so it’s not as important to maintain a narrow pH range like with DWC.


Endless defoliation.


I did a couple sprays with Beneficial Microbe Tea to inoculate the leaves and help reduce the likelihood of Powdery Mildew.


Like most of my harvest this was turned into bubble hash and then pressed into hash rosin. The quality of dried flower for outdoor is never as good as indoor, but for extracts the difference is pretty much indistinguishable.


Happy growing!


