This article will go over the basics of everything you need to grow outdoors Cannabis. My experience with outdoor cannabis is that it is cosmetically inferior to indoor but can have similar or equal potentcy when compared with indoor grown cannabis.

Overview
Indoor Vs Outdoor Cannabis
The main difference with outdoor cannabis is that it tends to yield leafier, less dense buds. Of course, there are regions like Humbolt County in California that have next to ideal outdoor growing conditions but most growers will have to fight with less than ideal outdoor conditions.

Outdoor cannabis must contend with cloudy days, rain, pests, wind, pollination from male plants in the area and fluctuating humidity/temperature. These external variables are much easier to control in indoor grows.
Must Have Items
- Nutrients (I recommend the GH Flora Series for outdoor and indoor)
- pH Meter & pH down (longer-term investment)
- OR pH Down & Test Kit (cheaper option)
- Soil – Pro Mix HP
- Starter Light (30 Watt, 100 Watt, 200 Watt)
- Light Timer
- 32 oz (1L) mason jars
- Training Wire, Twine or Twist Ties
Nice to Have Items
- Laundry racks (for drying)
- Temp/humidity monitor (for drying room)
- Kitchen Scale (for portioning)
I recommend using ProMix HP which stands for High Porosity. The high porosity allows for excellent drainage. Cannabis plants are susceptible to root rot, so you want a soil that drains well. If you can’t find ProMix HP any soil with a high amount of perlite will work well. Avoid miracle gro type soils that have slow-release nutrients.

ProMix HP also contains a beneficial mycorrhizal inoculum. This beneficial bacteria helps break down nutrients and make phosphorous more bio available. Phosphorous is very important later on in flowering, and the mycorrhizal helps with root health as well.
Pot Vs Directly In the Ground
Pots – Give you the advantage of allowing you to move your plants around. Late in the season people with a garage or shed can even bring their plants indoors to extend the growing season when fall rains or frost would otherwise force you to harvest.

The disadvantage of pots is increased cost, risk of being knocked over by strong winds and more frequent watering required.
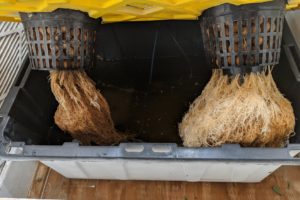
Growing directly in the ground – lets your cannabis plants tap deep down into the earth looking for soil. This can result in much larger plants because the pot volume can often become a rate-limiting factor. Also pot’s getting knocked over by the wind is not a concern for in-ground growers.
If you have room to move you plants inside to extend your growing season go with pots for sure. Otherwise it becomes a judgment call based on the garden you are working with.
pH Required for Soil Growing
The ideal pH for soil growing is a bit higher than for hydroponics. While with DWC you aim for 5.5 – 6.5 pH. For soil growing the ideal pH is between 6.0 and 6.8. Having a lower pH lower than 6.0 benefits hydroponic growing because it can inhibit bacterial growth but is not necessary in soil grows.
You can test the pH of runoff soil but this requirement is primarily for new batches of water you are mixing up. In my experience tap water tends to come out at 7-8 pH which is too high (alkaline) and will require a small amount of pH down (acid) to regulate.
Germination (Starting from Seed)
Starting from seed requires starting about 4-6 weeks earlier than if you are starting with clones. Use the paper towel germination method.
Paper Towel Germination
Start your DWC germination using a moist paper towel. Wet 2-3 sheets of paper towel using tap water. I don’t bother with adjusting pH this early into the grow. Ring the paper towel out so that it is moist but not dripping.


Spread the seeds out over the paper towel and fold over so that the seeds are sandwiched by at least two layers of paper towel. Work with clean hands and minimize air exposure after soaking.


Put this somewhere warm, 80F is ideal for germination but in my experience, anything above 65F will work fine.


Top of the fridge is an oft-recommended spot but when I actually tested surface temperatures in my house the top of my fridge was about 5 degrees colder than the top shelf in my pantry
If you live in a very cold climate like me and my fellow Canadians you can put the seeds in the oven with the light on to generate a bit of heat. Goes without saying you should put a sign up if you are using the oven method!

After 1-2 days the seedlings should crack and the taproot will begin growing. Leave them a few more days.

After 3-5 days the taproot should be over 1″ long. This is when they are ready for transplant. The seeds were a freebie so I’m ok with the 66% success rate. Typically, you should have 90% or greater germination rate for high-quality genetics.
Starting Plants Indoors
It is a good idea to get your plants going indoors for a few weeks, or even months, before moving outside. This will result in a higher yield and decrease the chance of small/immature plants getting destroyed by pests/animals. If you want some real monsters start your plants in January/February.

Check the Printed LED Board buying guide for some good options on veg lights. Don’t forget to get a light timer and set it to 18/6 (18 hours on, 6 hours off). “Blurple” lights will work OK for veg if you already have them but I recommend full spectrum LEDs (30 Watt, 100 Watt, 200 Watt) if you are buying new.
When to Move Plants Outdoors
The time to move plants outdoors is after the last frost of the season. Consult your local farmer’s almanac for historical dates, or keep a close eye on the weather for overnight temperatures below 0C/32F. In Southern Ontario (Canada) where I live plants typically go outside after the May 24 weekend.
Nutrients
Use the Nutrient Calculator to mix up batches of nutrient solution which you water the plants with. Set the pH to 6.0 before adding the nutrients. If you are pre-mixing up large batches at a time (to use for multiple feedings) buy a small air pump to keep the water aerated. Also, keep the water in a dark cool spot to prevent bacteria from growing if you are pre-mixing.

I give nutrients at every watering. I’m sure my plants enjoy eating during ever meal.
Training
For outdoor growing, you can top the plant but it is also not necessary. In my experience topped plants do not stand up well to strong outdoor winds and tend to crack. This is why so many of these branches have electrical tape on them.

If you don’t top or super crop the plants they will grow like Christmas trees. Tie the branches down to the pot to spread the colas out whichever method you go for. If you are not worried about the height I would recommend avoiding topping and letting the plants take on their natural shape, it evolved that way for a reason.

If you do break a branch use a wire wrap to bring the plant back together and then seal off with electrical tape. Avoid zip ties as they will choke your plant out as it grows. Electrical tape and a wire wrap will allow the plant to grow once it heals.
Powdery Mildew
White spots on your plants is an indication of powdery mildew (PM) and is the most common issue outdoor growers face.
Preventative measures inculde:
- Defoliation (remove fan leaves that are touching and create moist areas where PM can reproduce)
- Shaking plants dry after a rain
- Removing any leaves with early signs of PM
- Spraying with 0.3% peroxide
Powdery mildew can also be removed at the time of harvest by dipping the plants in hydrogen peroxide (H2O2). Most peroxide is sold at 3% and the ideal concentration for dipping is 0.3%. Simply mix 10 parts water to 1 part 3% peroxide. Dip plants in the peroxide mixture using your fingers to clean the flowers and get into any nooks and crannies. Then dip in clean (ideally distilled or RO) water to rinse. Leave to dry.

Male Plants
Male plants are something to keep an eye out for if starting from seed, even if using feminized seeds. Clones are a good safeguard from pollen-producing males.

Thank you to reddit user /u/greenchowdah for the picture of his male plant above. If you do not remove male plants before their pollen sacs open you will end up with seeds all throughout your plants. Something you want to avoid if possible. Note that in Southern Ontario many of my friends still ended up with seeds in their outdoor plants last season. This is either due to neighbours who did not read growdoctorguides or industrial hemp farms which can blow pollen for miles.
Bugs and Cannabis Plants
In nature, there tends to be a balance with bugs and predators, unlike indoor grows where pests can grow unchecked. We had many visitors last year, yet there was no major damage done. I would recommend against using any pesticides (this is why you’re growing your own anyways!)


Harvest
The criteria for when to harvest outdoor cannabis plants is similar to indoor plants. The thing with outdoor is you may be forced to harvest before ideal ripeness is reached. Harvest should always be done before the first frost, so keep an eye on the weather for frost warnings. If the flower freezes it will rupture cell walls and be ruined.

Another thing to watch out for is heavy rains in the fall. If the flowers get too wet and cannot dry out they can get moldy and rot away. Shake them well after any rains and if you are growing in pots move them under cover if at all possible.

For drying I recommend your room be around 60F and humidity levels at 50-60%. Laundry racks work great for drying. Use a small temp/humidity monitor to keep an eye on conditions in the drying room.

The Snap Test is one way to determine if your cannabis is ready for curing. Try to bend a medium-sized stem. If it bends easily and feels fresh you require more drying time. If it starts to crack but does not break you are ready for curing. If bending a stem causes it to snap completely you may have over-dried your cannabis, you fucked up. Don’t worry it can be rehydrated using Boveda Packs at the cost of some lost terpenes.
DO NOT OVER DRY your cannabis. I see new growers over drying their cannabis a lot more frequently than under drying it. Think of good commercial flower you have smoked before. You should need to use a grinder to grind it up properly. If you can grind it by rubbing between your fingers it is too dry.


Add 1 Ounce (~28g) to every 32 oz (1L) mason jar. Use a Kitchen Scale with a high capacity so you can zero the weight of the jar. This will allow you to track yield in your grow journal. Taking notes is essential to becoming a better grower.
The jars should be burped daily for the first two weeks. To burp the jars you open them for 1 – 30 minutes to release gases that build up during the curing process. Gently shake the jars to prevent clumping and promote air flow. After 3 weeks you will really notice the smell start to improve. After 4 weeks your cannabis is ready for consumption.
Save the Trimmings
Save any leaves that have visible trichomes. Fan leaves with no visible crystals on them should be composted or thrown out, including them in your extraction with increase chlorophyll levels while adding no benefit.

IMO the best thing to do with trimmings is to make cannabutter. I have so much of this stuff I can’t even give it all away. Check out my full DIY Cannabutter Guide for proper decarboxylation.

If you want a really high-end product you can do a solventless bubble bag extraction to get bubble hash which can be smoked or pressed into rosin.